Platform Integration Information for Credit Unions
Add or Update Admin Password in Symitar Quest
The steps included in this document help guide a credit union to add or update their admin password in Symitar Quest.
- Log in to Symitar Quest.
- In the toolbar, click Navigate > Management > Parameter Managers.
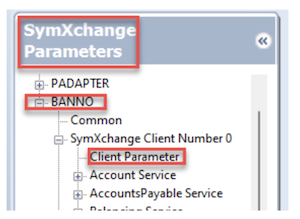
- In the Parameter Manager drop-down list, click SymXchange Parameters > Banno instance.
- Click SymXchange Client Number (the default is SymXchange Client Number 0) > Client Parameter.
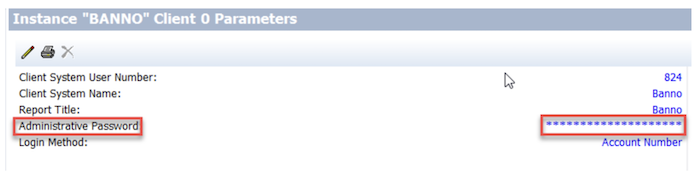
- After clicking Client Parameter, the masked Administrative Password displays.
- Update the Administrative Password per Banno requirements and click OK.
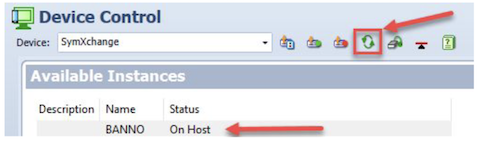
- After updating the Administrative Password, go to Device Control.
- For Device, select SymXchange from the drop-down list.
- Select the Banno SymXchange instance and refresh the instance by clicking the refresh button for the updated Administrative Password to be recognized.
SymXchange Implementation Blueprints for Banno
This blueprint is used to configure SymXchange for credit unions. The minimum Symitar release currently supported is 2020.01.
SYSTEM Web Console
Certificate Configuration
Network traffic between Symitar and Banno uses the SymXchange HTTPS protocol. This requires a certificate to be generated and exchanged between the client systems.
Create a Key configuration and certificate to be used for your Banno SymXchange instance:
- Log in to System Web Console.
- Navigate to Key Management > Key Store Configuration.
- Click the New Configuration button.
- At the
Nameprompt, enter a name for the new key configuration.- Ex: BANNO_SYMxxx (where xxx is the SYM number)
- At the
Descriptionprompt, enter a description for the new key configuration. - At the
Host SYMprompt, select the SYM under which SymXchange runs. - Click Save.
- The new key configuration now appears in the key store configuration list.
- From the list, select the new key configuration.
- Click the Key Stores tab.
- Click the Open Key Store icon next to the key store.
- Click Create Key.
- At the
Aliasprompt, enter an alias.- Ex: banno_symxxx (where xxx is the SYM number)
- At the
Days of Validityprompt, type 3650. - At the
Key Sizeprompt, select 2048 bits. - At the
Common Name (CN)prompt, enter a name.- Ex: symx.<CU_Name>.local
- Ex: symx.<CU_Name>.local
- Remaining fields are not required but can be filled in if desired.
- Click Create.
- The new key alias now appears in the key store.
Export the Public Key from the Banno instance.
- Log in to the System Web Console.
- In the System Web Console window, select Key Management from the menu list.
- The Key Store Configuration List pane appears.
- In the Configuration Name column, select the key configuration created for Banno.
- Select the Key Stores tab, and then click the Open Key Store icon.
- The Key Management pane appears.
- Click the Export icon.
- The Export Key dialog box appears.
- Leave the
Private Key Passwordprompt blank. - At the
File Nameprompt, type a relevant name. - At the
File Formatprompt, click the drop-down arrow, and then select PEM. - Click the Export button to save the .pem file to your local drive.
- Upload the certificate to the Banno Implementation/Update jSource case.
- Important: You must upload the file to a secure internal access point. Send the file using a secured method. Do not use email.
Import a Certificate for ECAAS.
- Banno will supply the .p12 certificate needed for the following steps in the For Clients case that we opened where setup was requested.
- Log in to System Web Console.
- Navigate to Key Management > Key Store Configuration.
- From the list, click the Banno key configuration created previously.
- Click the Key Stores tab.
- Click the Open Key Store (folder) icon to the right of the key store.
- Click Import.
- Choose the .p12 certificate to import
- The Alias must be ecaas_id_provider. ID cannot be changed to the sym number.
- Enter the password for the certificate(if you forget the password the certificate will not import)
- Click Import
- Click the button in the Trust column for the ecaas_id_provider entry.
- The following message appears:
Trust key result: Successfully copied certificate.
- The following message appears:
- Navigate back to Key Management Trust Store, you should now see the ecass_id_provider certificate listed.
Import Banno’s Public Certificate into SymXchange and ECAAS.
- Log in to System Web Console.
- Navigate to Key Management > Key Store Configuration.
- From the list, click the Banno key configuration created previously.
- Click the Key Stores tab.
- Click the Open Trust Store (folder) icon to the right of the key store.
- Click Import.
- Click Choose, and then navigate to the file containing the Banno-provided certificate.
- Click Upload.
- A dialog box appears with the public key in .pem format.
- At the
Aliasprompt, enter service_banno.- The alias must be service_banno.
- The alias should be all lowercase without spaces.
- Click Import.
- The public certificate now appears as part of the trust store.
SymXchange Web Services Configurations
Enable services for SymXchange Instance Services Configuration:
| Service | Version |
|---|---|
| AccountService | |
| EcaaService | |
| EpisysInformationService | |
| FileManagementService | |
| FindByService | |
| InformationService | |
| PowerOnService | |
| TransactionsService |
| SymXchange Instance Device Mapping Configuration | |
|---|---|
| Device Type | BANNO |
| Device Number | 20 + CU 3-digit # |
| Client Number | Use first available for Instance, usually 0 |
| SymXchange Instance Web Server Configuration | |
|---|---|
| HTTP(s) Port Number | Any available |
| Protocol+++ | https |
| Key Configuration Name+++ | Select from dropdown |
| Key Alias+++ | Select from dropdown |
| Add White List IPv4 Addresses |
+++ Requires Certificate Configuration to be completed first in order to make selection.
| SymXchange Instance Details Configuration | |
|---|---|
| Number of SymXchange Web Service Posters | 15 |
+++ If Geezeo is also being installed, the number of posters should be set to 25.
SymXchange Parameters
SymXchange Client Parameters
The following SymXchange Client Parameters are a small list of parameters that should be set, however, it is the CU’s responsibility to ensure remaining SymXchange parameters are reviewed to confirm that they’re set up according to their policies:
| Parameter Name | Setting |
|---|---|
| Client System User Number | Set accordingly |
| Client System Name | SymXchange – Banno |
| Report Title | SymXchange – Banno |
| Administrative Password | CU Preference |
| Use HB Password? | Yes |
| Allow PIN FM? | Yes |
| Credit Card Masking Method | 1 |
| Transaction Source Code | Set accordingly |
| Inv Attempts Before Frozen | 20 |
| FM in Posting Journal | Yes |
| Review ALL Past Due Days Parameters | Set accordingly |
| Review ALL GL Parameters | Set accordingly |
| Services for Transfer In, Out, Withdrawal and Deposit | Set accordingly |
| Maximum Response Fields | 10,000 |
| Maximum Specfile Lines | 10,000 |
| Maximum All Field Count | 10,000 |
| ODT/ODP settings | Set accordingly |
Service Operations
Enable the specified credential(s) for the SymXchange per Operation Credentials Parameters for each method(s):
| Service | Record | Operation | Credential(s) |
|---|---|---|---|
| Account | Account | getAccount | |
| Account | Account | getAccountSelectFieldsFilterChildren | |
| Account | Account | updateAccountByID | |
| Account | Card | searchCardSelectFields | |
| Account | Card | searchCardPageSelectFields | |
| Account | Card | updateCardByID | |
| Account | EFT | createEft | |
| Account | EFT | deleteEft | |
| Account | EFT | getEftListSelectFields | |
| Account | EFT | getEftPagedListSelectFields | |
| Account | EFT | getEftSelectFields | |
| Account | EFT | updateEftByID | |
| Account | ExternalLoanName | updateExternalLoanNameByID. | |
| Account | ExternalLoanTransfer | createExternalLoanTransfer | |
| Account | ExternalLoanTransfer | getExternalLoanTransferSelectFields | |
| Account | ExternalLoanTransfer | updateExternalLoanTransferByID | |
| Account | ExternalLoanTransfer | searchExternalLoanTransferPagedSelectFields | |
| Account | Loan | getLoan | |
| Account | Loan | getLoanListSelectFields | |
| Account | Loan | getLoanPagedListSelectFields | |
| Account | Loan | getLoanSelectFieldsFilterChildren | |
| Account | Loan | updateLoanByID | |
| Account | LoanName | updateLoanNameByID | |
| Account | LoanTransaction | getLoanTransactionPagedListSelectFields | |
| Account | LoanTransfer | createLoanTransfer | |
| Account | LoanTransfer | deleteLoanTransfer | |
| Account | LoanTransfer | getLoanTransferListSelectFields | |
| Account | LoanTransfer | getLoanTransferSelectFields | |
| Account | LoanTransfer | searchLoanTransferPagedSelectFields | |
| Account | LoanTransfer | updateLoanTransferByID | |
| Account | Name | getNameListSelectFields | |
| Account | Name | getNamePagedListSelectFields | |
| Account | Name | searchNameSelectFields | |
| Account | Name | searchNamePagedSelectFields | |
| Account | Name | updateNameByID | |
| Account | Preference | createPreference | |
| Account | Preference | searchPreferenceSelectFields | |
| Account | Preference | searchPreferencePagedSelectFields | |
| Account | Preference | updatePreferenceByID | |
| Account | Share | getShare | |
| Account | Share | getShareListSelectFields | |
| Account | Share | getShareSelectFieldsFilterChildren | |
| Account | Share | updateShareByID | |
| Account | ShareHold | createShareHold | |
| Account | ShareHold | updateShareHoldByID | |
| Account | ShareName | updateShareNameByID | |
| Account | ShareTransaction | getShareTransactionPagedListSelectFields | |
| Account | ShareTransaction | searchShareTransactionPagedSelectFields | |
| Account | ShareTransaction | searchShareTransactionSelectFields | |
| Account | ShareTransfer | createShareTransfer | |
| Account | ShareTransfer | deleteShareTransfer | |
| Account | ShareTransfer | getShareTransferListSelectFields | |
| Account | ShareTransfer | getShareTransferSelectFields | |
| Account | ShareTransfer | updateShareTransferByID | |
| Account | Tracking | searchTrackingSelectFields | |
| Account | Tracking | searchTrackingPagedSelectFields | |
| EpisysInformation | getGeneralEpisysInformation | ||
| FileManagement | downloadDataFile | ||
| FileManagement | uploadDataFile | ||
| FindBy | findByHomeUser | ||
| General Ledger | searchGlHistoryPagedSelectFields | ||
| Information | getGeneralInformation | ||
| PowerOn | executePowerOn | ||
| Transactions | deposit | ||
| Transactions | transfer | ||
| Transactions | reverseWithdraw | ||
| Transactions | reverseWithdrawFee | ||
| Transactions | withdraw | ||
| Transactions | withdrawFee |
PowerOns and Letterfiles
All available Banno feature PowerOn® specfiles and letterfiles can be provided by a SymXchange Analyst. Specfiles must be uploaded to the SYM, installed for demand use, and entered in the SymXchange Common Parameters for the SymXchange Instance using the Individual Specfile Load Method.
Required
The following PowerOn® specfiles are required for standard Banno features:
- BANNO.ALERT.TRANSACTIONS.V1
- BANNO.ALERT.TRANSFILE.V1
- BANNO.NT.ENROLLMENT.V2 (only required for NetTeller clients)
- BANNO.PENDINGTRANS.IQ.V3.POW
- SYMX.GETMISCPARAMS.BANNO
- BANNO.TRANSFERLIST.V7.POW
Optional
The following PowerOn® specfiles and letterfiles are for specific optional features that are not part of standard Banno services and will require the credit union to open a support case with Banno to assist with additional configurations.
| PowerOn | LetterFile |
|---|---|
| BANNO.CDRENEW.V1.POW | BANNO.CDRENEW.V1.CFG |
| BANNO.CHANGE.ADDR.V1.POW | BANNO.CHANGE.ADDR.V1.CFG |
| BANNO.LOANPAYMENT.SKIP.V1.POW | BANNO.LOANPAYMENT.SKIP.CFG |
| BANNO.LOAN.PAYOFF.V1.POW | BANNO.LOAN.PAYOFF.V1.CFG |
| BANNO.ODTOPTIN.V1.POW | BANNO.ODTOPTIN.V1.CFG |
| BANNO.NEWSUBCREATE.V1.CONFIG | |
| BANNO.NEWSUBCREATE.V1.POW | |
| BANNO.CHECK.WITHDRAW.V1.POW | BANNO.CHECK.WITHDRAW.V1.CFG |
| GEEZEO |
Banno Blueprint Change Log
| Date | Changes | Updated by | | — | — | | 2/18/2026 |
- Updated the ECAAS certiicate section to reflect the new requirement of importing a certificate rather than creating it in Web Console.
- Brian Frost
- Added the following operations for Persistent version support:
searchCardPagedSelectFieldsgetEftPagedListSelectFieldsgetLoanPagedListSelectFieldssearchNamePagedSelectFieldssearchPreferencePagedSelectFieldsgetShareTransferPagedListSelectFieldssearchTrackingPagedSelectFieldsupdateShareNameByIDupdateLoanNameByIDupdateExternalLoanNameByIDgetGeneralInformation- Added
Informationservice for Persistent version support
- Removed
BANNO.DATABASE.CHECK.V1.POWPowerOn
- Added Geezeo-specific changes:
- Included
GEEZEOPowerOn name to optional PowerOn section - Added note to increase SymXchange posters to 25 when Geezeo is in use
- Added
getNamePagedListSelectFields - Added additional operations for Rapid Transfers:
withdrawdepositreverseWithdrawreverseWithdrawFeeupdateShareHoldByID- Moved
BANNO.DATABASE.CHECK.V1.POWPowerOn from Required to Optional | | 02/06/2023 |- Added Create a Certificate for ECAAS section for Token Authentication |
| 03/11/2025 |
- Removed 2018.01 services as minimum version requirement is 2020.01
- Added Persistent versions
- Added
ExternalLoanandExternalLoanTransferrecords for scheduled external loan support
- Added
searchLoanTransferPagedSelectFieldsfor Loan Transfer record support |SymXchange Implementation Blueprints for Jack Henry ISO Wires
This blueprint is used to configure SymXchange Jack Henry ISO Wires for credit unions. The minimum Symitar release currently supported is 2020.01.
SYSTEM Web Console
Certificate Configuration
Network traffic between Symitar and JH ISO Wires uses the SymXchange HTTPS protocol. This requires a certificate to be generated and exchanged between the client systems.
Create a Key configuration and certificate to be used for your JH ISO Wires SymXchange instance.
- Log in to System Web Console.
- Navigate to Key Management > Key Store Configuration.
- Click the New Configuration button.
- At the
Nameprompt, enter a name for the new key configuration.- Ex: JHProxyService_SYMxxx (where xxx is the SYM number)
- At the
Descriptionprompt, enter a description for the new key configuration. - At the
Host SYMprompt, select the SYM under which SymXchange runs. - Click Save.
- The new key configuration now appears in the key store configuration list.
- From the list, select the new key configuration.
- Click the Key Stores tab.
- Click the Open Key Store icon next to the key store.
- Click Create Key.
- At the
Aliasprompt, enter an alias.- Ex: jhproxyservice_symxxx (where xxx is the SYM number)
- At the
Days of Validityprompt, type 3650. - At the
Key Sizeprompt, select 2048 bits. - At the
Common Name (CN)prompt, enter a name.- Ex: symx.<CU_Name>.local
- Ex: symx.<CU_Name>.local
- Remaining fields are not required but can be filled in if desired.
- Click Create.
- The new key alias now appears in the key store.
Export the Public Key from the JHProxyService Key Configuration
- Log in to the System Web Console.
- In the System Web Console window, select Key Management from the menu list and click on Key Store Configuration.
- The Key Store Configuration List pane appears.
- In the Configuration Name column, select the key configuration created for JHProxyService.
- Select the Key Stores tab, and then click the Open Key Store icon.
- The Key Management pane appears.
- Click the Export icon.
- The Export Key dialog box appears.
- Leave the
Private Key Passwordprompt blank. - At the
File Nameprompt, type a relevant name. - At the
File Formatprompt, click the drop-down arrow, and then select PEM. - Click the Export button to save the .pem file to your local drive.
- Upload the certificate to the JH ISO Wires Implementation/Update jSource case.
- Important: You must upload the file to a secure internal access point. Send the file using a secured method. Do not use email.
Import a Certificate for ECAAS
- Banno will supply the .p12 certificate needed for the following steps in the For Clients case that we opened where setup was requested.
- Log in to System Web Console.
- Navigate to Key Management > Key Store Configuration.
- From the list, click the Banno key configuration created previously.
- Click the Key Stores tab.
- Click the Open Key Store (folder) icon to the right of the key store.
- Click Import.
- Choose the .p12 certificate to import
- The Alias must be ecaas_id_provider. ID cannot be changed to the sym number.
- Enter the password for the certificate(if you forget the password the certificate will not import)
- Click Import
- Click the button in the Trust column for the ecaas_id_provider entry.
- The following message appears:
Trust key result: Successfully copied certificate.
- The following message appears:
- Navigate back to Key Management Trust Store, you should now see the ecass_id_provider certificate listed.
Import Banno’s Public Certificate into Key Store
- Log in to System Web Console.
- Navigate to Key Management > Key Store Configuration.
- From the list, click the JHProxyService key configuration created previously.
- Click the Key Stores tab.
- Click the Open Trust Store (folder) icon to the right of the key store.
- Click Import.
- Click Choose, and then navigate to the file containing the Banno-provided certificate.
- Click Upload.
- A dialog box appears with the public key in .pem format.
- At the
Aliasprompt, enter service_banno.- The alias must be service_banno.
- The alias should be all lowercase without spaces.
- Click Import.
- The public certificate now appears as part of the trust store.
SymXchange Web Services Configurations
Enable services for SymXchange Instance Services Configuration:
Service Version AccountService - 2020.01
- Persistent
EcaaService - 2020.01
- Persistent
EpisysInformationService - 2020.01
FindByService - 2020.01
- Persistent
GeneralLedgerService - 2020.01
- Persistent
InformationService - Persistent
TransactionsService - 2020.01
- Persistent
SymXchange Instance Device Mapping Configuration Device Type JHWIRESISO Device Number 20 + CU 3-digit # Client Number Use first available for Instance, usually 0 SymXchange Instance Web Server Configuration HTTP(s) Port Number Any available Protocol+++ https Key Configuration Name+++ Select from dropdown Key Alias+++ Select from dropdown Add White List IPv4 Addresses - 10.90.72.0-255
- 10.90.86.0-255
- 10.90.100.0-255
+++ Requires Certificate Configuration to be completed first in order to make selection.
SymXchange Instance Details Configuration Number of SymXchange Web Service Posters 15 SymXchange Parameters
SymXchange Client Parameters
The following SymXchange Client Parameters are a small list of parameters that should be set, however, it is the CU’s responsibility to ensure remaining SymXchange parameters are reviewed to confirm that they’re set up according to their policies:
Parameter Name Setting Client System User Number Set accordingly Client System Name SymXchange – JHWires ISO Report Title SymXchange – JHWires ISO Administrative Password CU Preference Transaction Source Code Set accordingly FM in Posting Journal Yes Review ALL Past Due Days Parameters Set accordingly Review ALL GL Parameters Set accordingly Services for Transfer In, Out, Withdrawal and Deposit Set accordingly Maximum Response Fields 10,000 Maximum Specfile Lines 10,000 Maximum All Field Count 10,000 ODT/ODP settings Set accordingly Service Operations
Enable the specified credential(s) for the SymXchange per Operation Credentials Parameters for each method(s):
Service Record Operation Credential(s) Account Account getAccount - Home Banking
- Admin Password
Account Account getAccountSelectFields - Home Banking
- Admin Password
Account Account getAccountSelectFieldsFilterChildren - Home Banking
- Admin Password
Account Share getShare - Home Banking
- Admin Password
Account Share getShareListSelectFields - Home Banking
- Admin Password
Account Share getShareSelectFieldsFilterChildren - Home Banking
- Admin Password
Account ShareTransaction searchShareTransactionSelectFields - Home Banking
- Admin Password
Account ShareAnalysis searchShareAnalysisPagedSelectFields - Home Banking
- Admin Password
Account ShareAnalysis updateShareAnalysisByID - Home Banking
- Admin Password
Account ShareHold createShareHold - Home Banking
- Admin Password
Account ShareHold updateShareHoldByID - Home Banking
- Admin Password
EpisysInformation getGeneralEpisysInformation - Admin Password
FindBy findByHomeUser - Admin Password
FindBy findByShortName - Admin Password
GeneralLedger GlAccount getGlAccountSelectFields - Admin Password
Information getGeneralInformation - Admin Password
Transactions Deposit - Home Banking
- Admin Password
Transactions GLToGLPost - Home Banking
- Admin Password
Transactions withdraw - Home Banking
- Admin Password
Transactions withdrawFee - Home Banking
- Admin Password
JH ISO Change Log
Date Changes Updated by 02/19/2026 - Edited the ECAAS certificate portion to import certs instead of creating certs
- Brian Frost
02/11/2025 - Removed unused services
01/22/2025 - Modified services
- Added GeneralLedger record
01/15/2025 - Created
Related
- Added Create a Certificate for ECAAS section for Token Authentication |
| 03/11/2025 |